Once you have loaded data into EasyMorph (and profiled it), you can start transforming it.
Adding actions
Throughout the tutorial, the terms transformation and action will be used interchangeably. Actions (transformations) can be added (applied) to tables in various ways:
The basic way, which can be used for all actions, is to click "Add action" in menu "Main" to get the list of available actions, and then drag needed actions from the list (in the sidebar) onto a table. You can insert actions at the end of the actions chain, or between existing actions.
Another way to transform data is to use the context menu commands. For instance, when you click the context menu icon in a column header (or right-click the header) and choose Remove column, EasyMorph automatically creates the "Remove columns" action with the current column(s) selected. You can apply the commands from the right-click menu to multiple columns at once. To select multiple columns, Ctrl+click their headers.
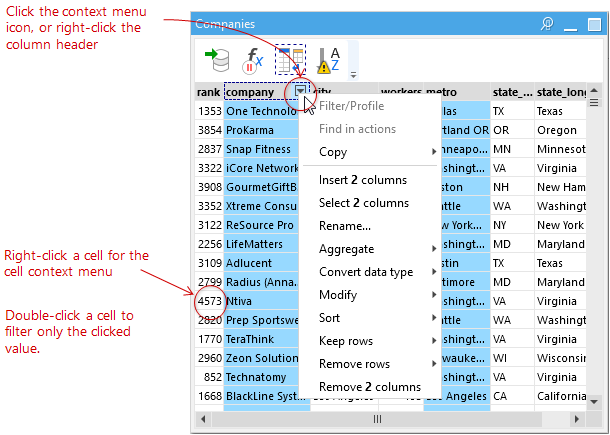
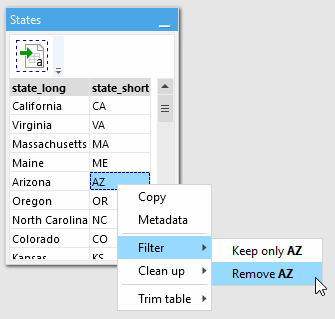
You can also use the cell context menu to automatically create "Filter", "Clean up" and "Trim" actions. Right-click a cell and choose a command.
Note that in some cases, automatically created actions might have incomplete properties. For instance, when you aggregate data using the column context menu EasyMorph automatically creates the "Aggregate" action and tries to guess anticipated aggregated functions and grouping. To change the aggregation function and grouping you may need to additionally edit properties of the "Aggregate" action in the side bar.
The full list of available actions with examples is available in the web-help. See Help: actions.
Editing action chains
There is a number of operations that can be performed with actions in a project:
- Drag actions inside a table to reorder them
- Drag actions between tables to move an action from one table to another
- Drag an action on the gray workspace to remove it
- Press Ctrl key and drag an action to copy it
- Right-click an action and choose Copy to copy it to another table or to another project
- Right-click an action and choose Split here to split an action chain and move the rest of the chain to a new derived table
- Right-click a table and choose Merge derived table for merging all actions from a derived table (opposite operation to the one above)
- Right-click an action and choose Discard results to discard its current result and force recalculation (if Auto-run is on)
- When Auto-run is off — Ctrl + click an action, or right-click it, and choose Calculate to calculate all actions up to the clicked actions, but not further