The Server Link is a mechanism that makes EasyMorph Desktop integrate with EasyMorph Server and use some of its capabilities. When configured, the Server Link automatically connects your Desktop with the Server on application start. This connection allows Desktop users to work and collaborate with the help of the Server:
- Share datasets via Server — publish datasets to and open from Server
- Share projects — publish projects to and open from Server
- Create and manage a common Data Catalog to share and consume data and data assets (such as BI reports)
- Sharing a Server-hosted connector repository with other Desktop users
A configured Server Link is not mandatory for Desktop, however some Desktop features explained in this chapter require Server and Server Link. Therefore, we want to ensure that you know how to link your Desktop to EasyMorph Server.
Configuring Server Link
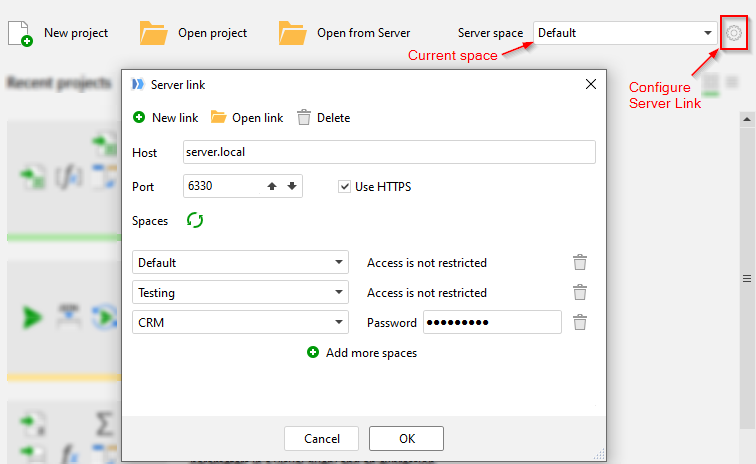
The Server Link can be configured from the Start screen of EasyMorph Desktop. It requires specifying the Server host (the Server computer name) and at least 1 Server space (typically your team or department should have a designated Server space). If you're not sure about the Server host and space name, consult with your nearest Server administrator. While multiple Server spaces can be configured in the Server Link, it connects to only one space at a time, which becomes the current space. Switching spaces can be done from the Start screen as well.

Hint: There can be multiple Server connections configured in the Server Link. This allows quick switching between, for instance, production and development Servers.
Leasing a license from Server
Once you have configured the Server Link, you can automatically obtain a user license from the Server. See this article for more details: "How to lease a license from EasyMorph Server".
Server-hosted connector repository
In organizations that employ EasyMorph Server, it is possible (and recommended) to make Desktops use a connector repository provided by the Server via the Server Link. A Server-hosted connector repository is a more secure option compared to file-based repositories described earlier in this tutorial. Accessing a Server-hosted repository can be restricted to the users of the Server space that provides the repository. Additionally, copying connectors from such a repository can be disabled by Server administrator. At the same time, creating new and editing existing connectors is still possible via the Desktop's Connection Manager, even for Server-hosted repositories.
To start using a Server-hosted connector repository:
- If you are a Server administrator, in the Server space settings, permit accessing to the connector repository for Desktops (it's disabled by default). Skip this step if you're not a Server administrator.
- In EasyMorph Desktop, configure the Server Link as described above.
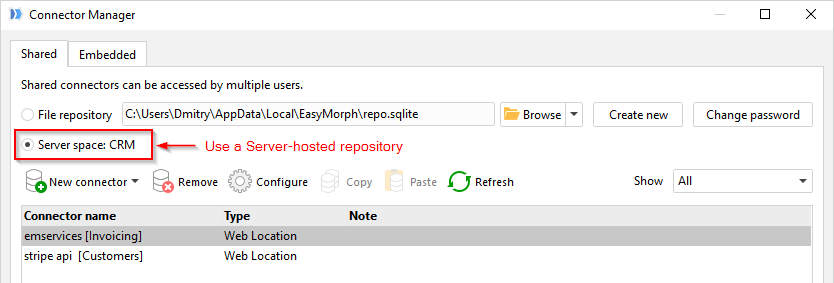
- In EasyMorph Desktop, open the Connector Manager and switch to using the Server Link (see screenshot below)

Note that if Server Link is switched to another space, the current repository is also switched to the repository of that space. The location of the current connector repository can always be seen in the application's status bar (see screenshot below).

Hint: When a project with actions that use Server Link is executed on EasyMorph Server, it uses the connector repository of the Server space in which the project is executed.
Publishing projects to Server / Opening projects from Server
To publish the currently open project to Server, press the "Publish to Server" button in the "Project" menu. When the dialog "Publish project to Server" opens, select a location in the public folder of the current space. Publishing a project is equivalent to uploading the project to Server using the Server's web interface.

Opening a project from Server can be done from the Start screen. After the Server Link is configured, the "Open from Server" button appears next to the regular "Open project" button (can be seen in the uppermost screenshot on this page). When a project is opened from Server, a local copy is saved first and then is opened in EasyMorph. When editing the project, it's the local copy that becomes edited. Saving an edited project doesn't upload it automatically back to Server. To publish the edited project to Server, publish its local copy by pressing the "Publish to Server" button as described above.
Sending datasets to Server / Receiving datasets from Server
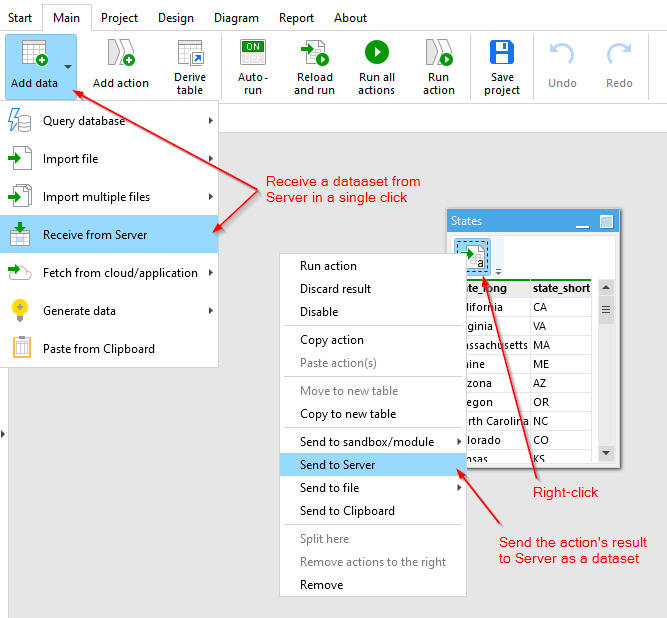
The result of any action can be sent (published) to Server as an EasyMorph dataset in two clicks. It makes it easy to share data between EasyMorph users. To send the result of an action to Server, right-click the action and choose "Send to Server".

To receive a dataset from Server, press the "Add data" button and choose "Receive from Server". The "Import dataset" action will be created automatically and the selected dataset will be immediately fetched from Server.
Both the "Import dataset" and "Export dataset" actions support Server Link as a source/destination. It makes it possible to securely store datasets on EasyMorph Server (as an alternative to storing data in a database) and fetch them on the fly, when a project is opened. This technique is called "hot-linking datasets". It also makes it easy to share a project with another person. The project will be automatically populated with data as soon as the recipient opens it. To read more on hot-linking datasets, see this Community forum article: "Server Link explained".