Welcome to the EasyMorph quick start guide! EasyMorph is a visual data preparation, analysis, and automation tool designed to help business professionals and data analysts to extract, analyze, merge, clean, transform, and move data without writing code.
In this tutorial, we will walk you through how to get started with EasyMorph so you can begin building your very first data preparation and automation workflow. We’ll cover:
- Downloading and installing EasyMorph
- Navigating within EasyMorph
- Understanding workflows and how they are structured
- Building a simple data preparation workflow
Downloading and installing EasyMorph Desktop
If you haven’t already, you’ll need to begin by downloading and installing the latest release of EasyMorph Desktop. You can do so by clicking the link below:
Download EasyMorph Desktop
Once downloaded, open the zip file and run the EasyMorph.Setup.exe file it contains. The installation wizard should begin.
If installing EasyMorph Desktop on your work computer, you may find that you do not have permissions to be able to install new software. If this is the case, contact your IT department for their help to install EasyMorph.
Simply follow the steps in the installation wizard. The installation should take only a couple of minutes. Once complete, if you leave the check boxes ticked and click on Finish, EasyMorph Desktop will open for the first time.
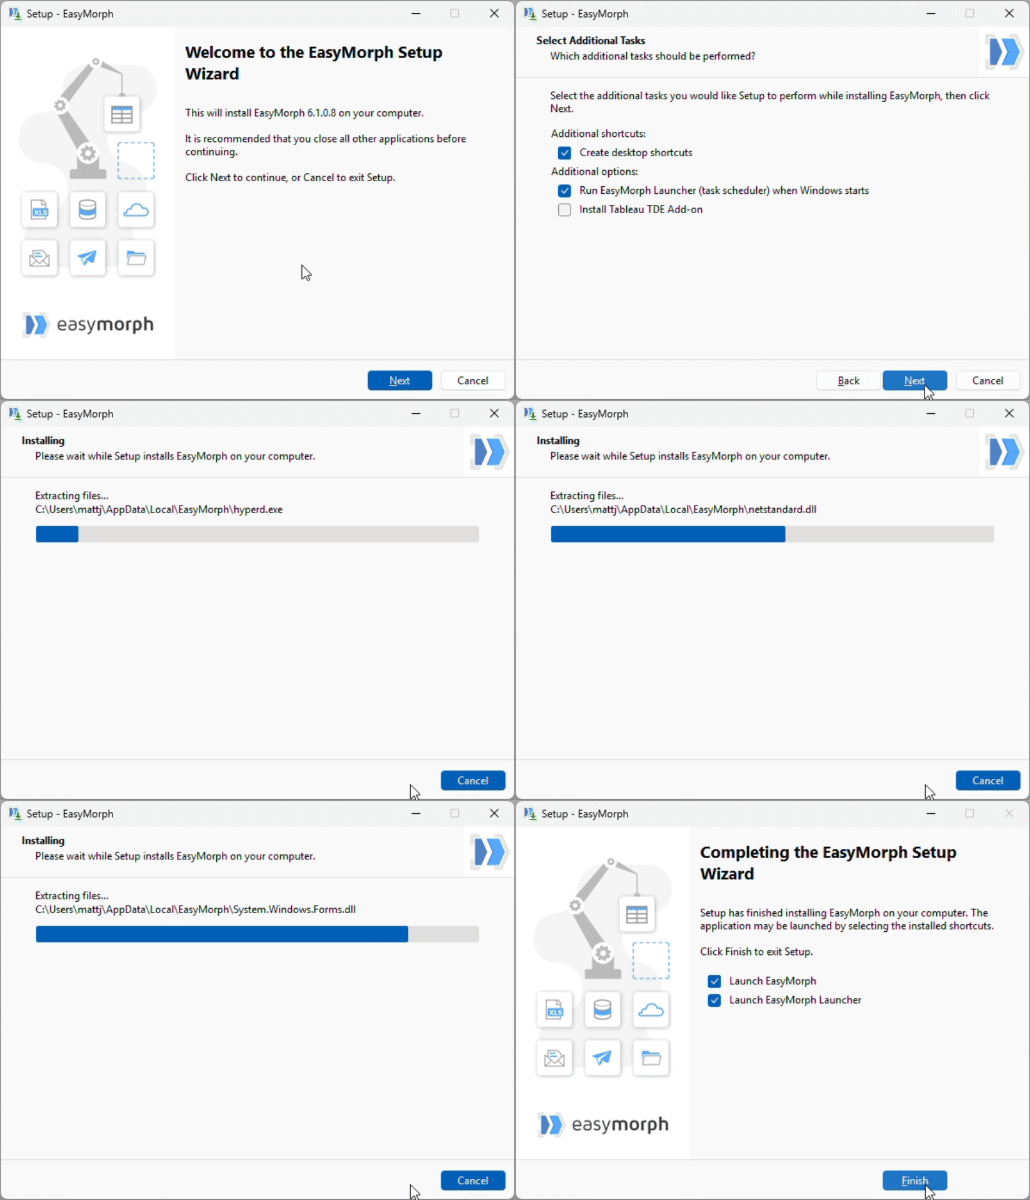
As well as EasyMorph Desktop, a companion app called EasyMorph Launcher was also installed. EasyMorph Launcher allows you to easily schedule and run workflows. For more information, check out the Launcher Workflow scheduling section later in these tutorials.
Opening EasyMorph for the first time
When you open EasyMorph for the first time, a setup wizard will prompt you to either use the free version, request a trial license key for the fully featured pro edition, or to apply an existing licence key. Simply follow the prompts and you will be guided through necessary steps.
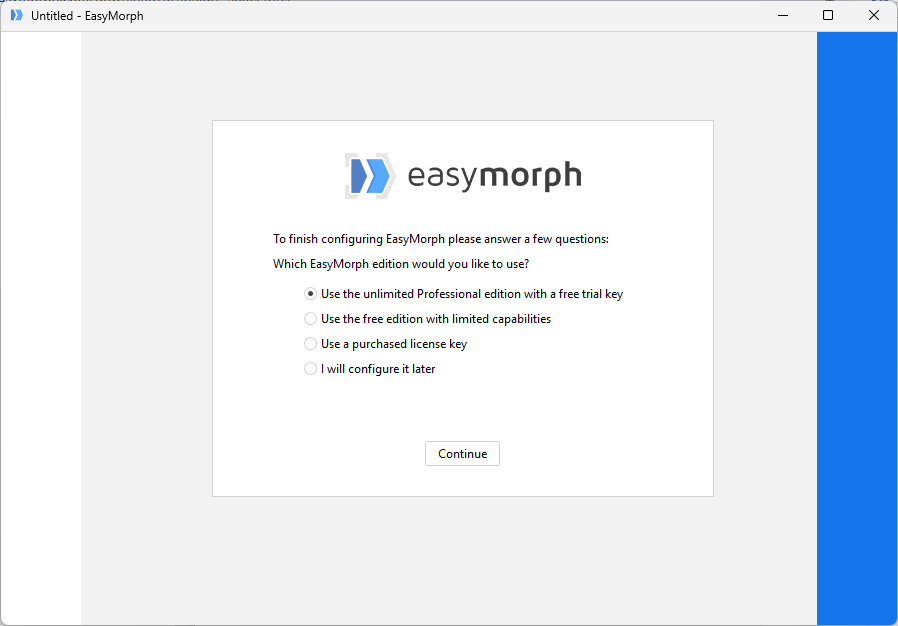
Once you’ve completed the initial setup, you will begin in the workflow editor with a new blank project ready to start building your first workflow.
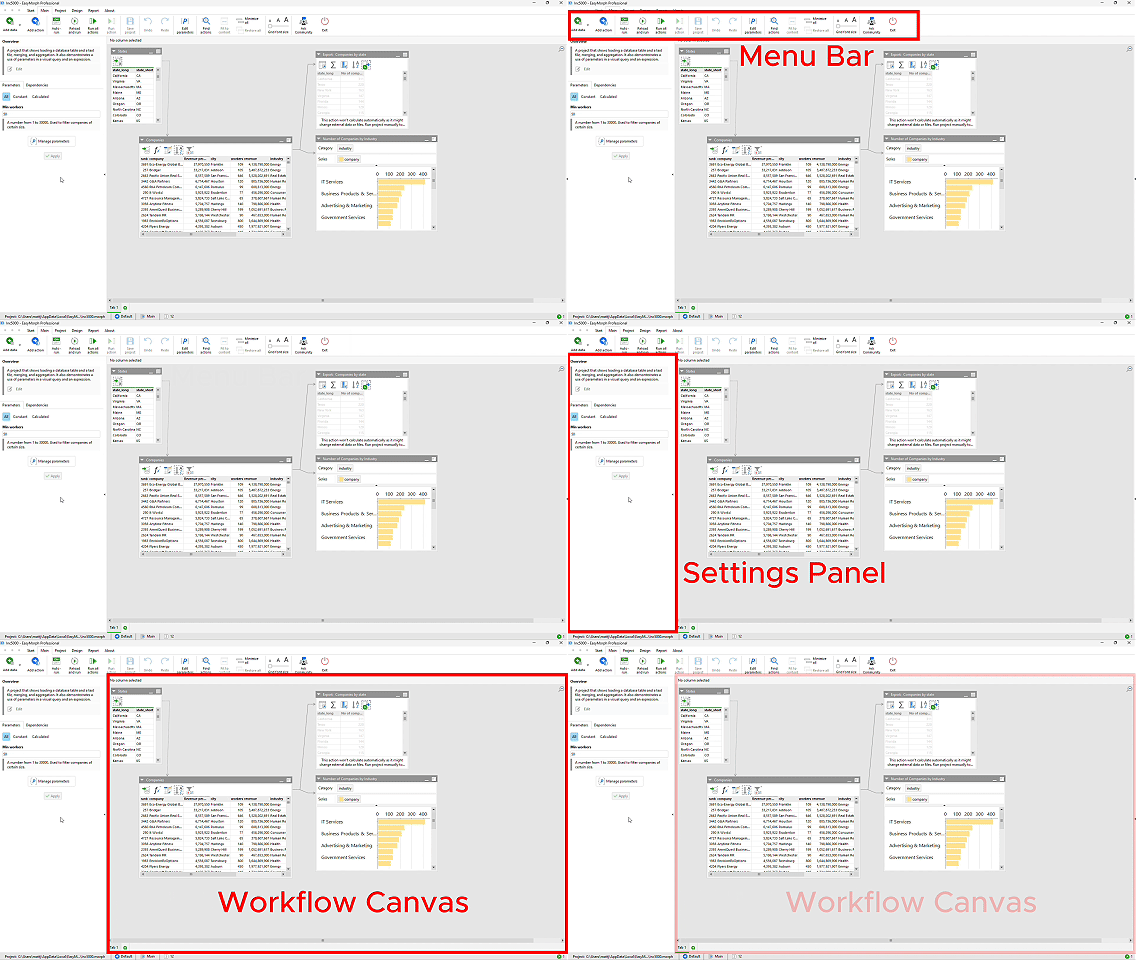
The workflow editor comprises 3 main sections:
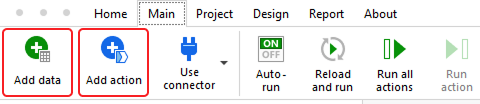
- At the top is the navigation bar which contains buttons for adding elements to our workflows, opening and saving projects, etc. When building or modifying workflows we mainly use the two button on the left of the navigation bar: Add data and Add action.
- To the left is the settings panel which we will use to configure the individual elements of a workflow as we build it.
- The rest of the screen is taken up with the workflow canvas where we can see and edit our workflow as we build it.
Understanding EasyMorph workflows
Even if you are experienced with other workflow-based data preparation tools, EasyMorph workflows have significant differences and benefits. So before beginning to build our first workflow, let’s cover some of the basic concepts.
Tables and actions
An EasyMorph workflow is made up of one or more tables shown in the workflow canvas. Each table represents a single table of data transformed step by step.
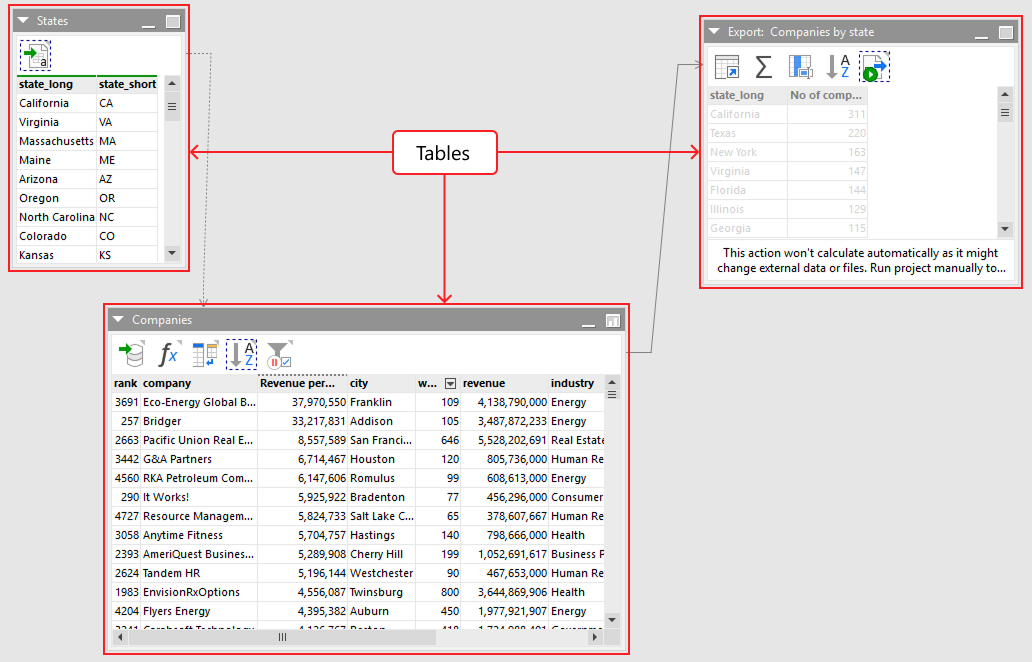
Each table in the workflow comprises two main parts:
- At the top is a row of icons know as the action chain
- The rest of the table shows the datagrid
Each icon in the action chain is an Action. Actions in the action chain are performed sequentially from left to right. We can consider the data as being passed along the chain from action to action. If we select any action in the action chain, the data grid will show us the data as it is at that step.
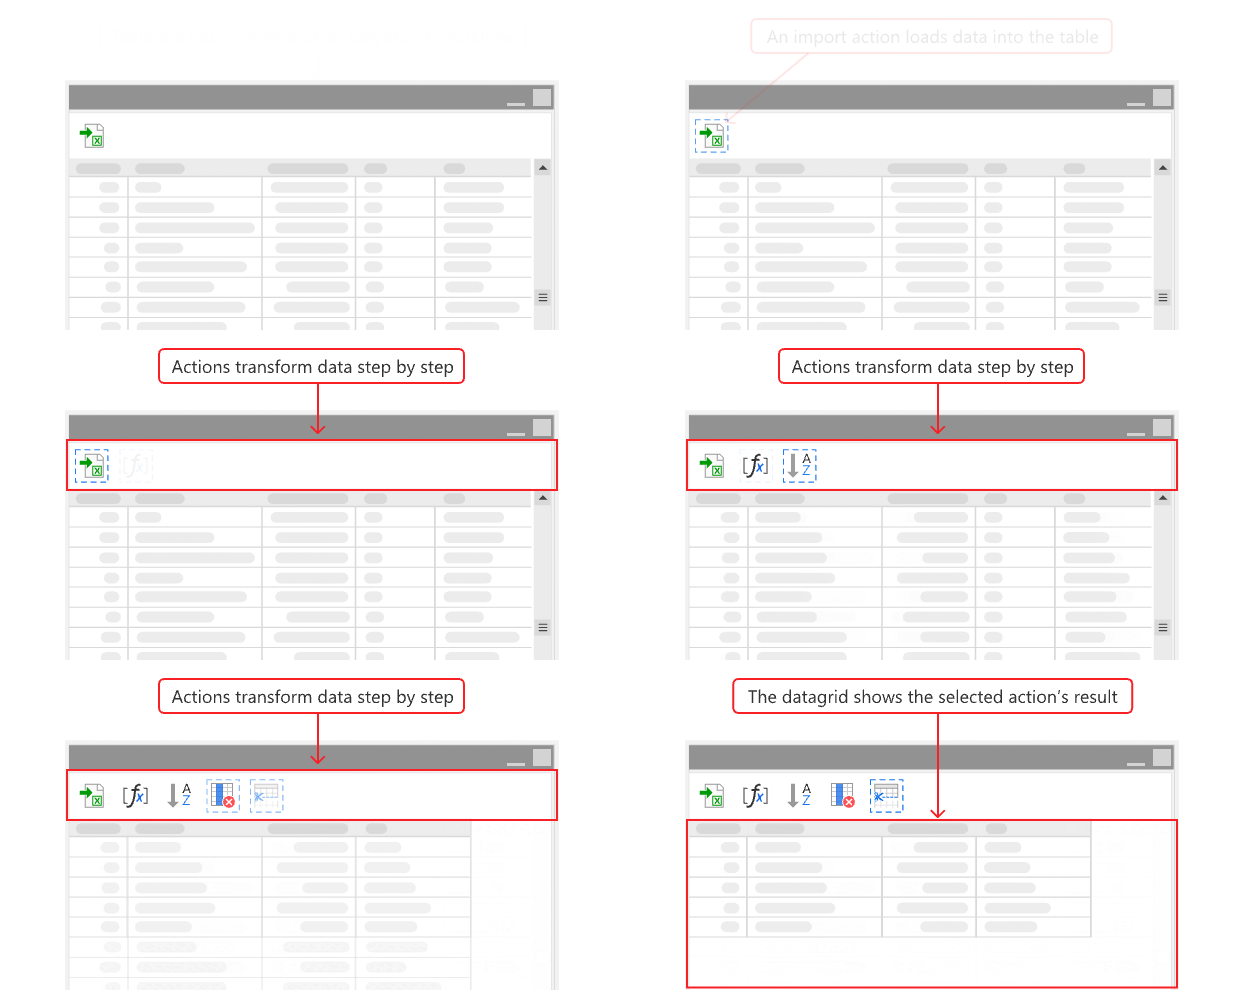
In EasyMorph, the table’s data grid shows us all of the data all of the time; not just a sample like in most other data tools. Thanks to EasyMorph’s data engine, this is true even when working with very large volumes of data on an average business computer.
Each action added to a table’s action chain performs a specific step (e.g. loading data from a file or database, sorting and filtering it, etc). There are more than 180 inbuilt actions available for us to use when creating workflows.
Connecting tables
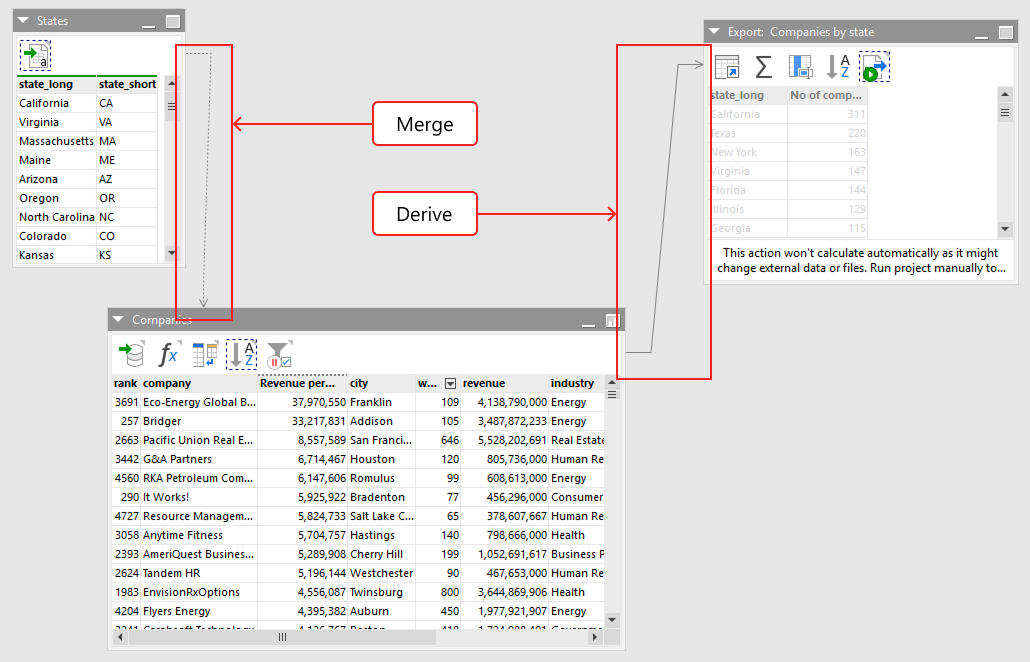
As well as data flowing from action to action within a table’s action chain, data can also flow from one table to another. There a two main scenarios where this occurs:
- Deriving — instead of beginning a new table by loading in or creating a new set of data, we can also derive a new table from an existing table. In this scenario, the data from the end of one table becomes the starting data of another. A solid arrow indicates the direction the data flows in between the two tables.
- Merging — if we use an action which merges one set of data into another (i.e. an append, lookup or join) then we see a dotted arrow showing the direction of the data.
Build your first workflow
Now that we have covered the theory, let’s begin building our first workflow.
Adding a data file
A workflow most commonly begins by loading data, such as a spreadsheet, into EasyMorph. We can do this by clicking on the Add data button on the left of the top navigation bar.
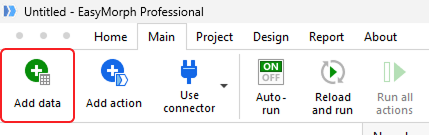
When clicked, a dialog will open guiding us through loading our data. EasyMorph supports loading data from many different file formats, databases and other sources. Let’s begin by loading this simple Excel spreadsheet (download it below).
Sample data download Sample_data.xlsx
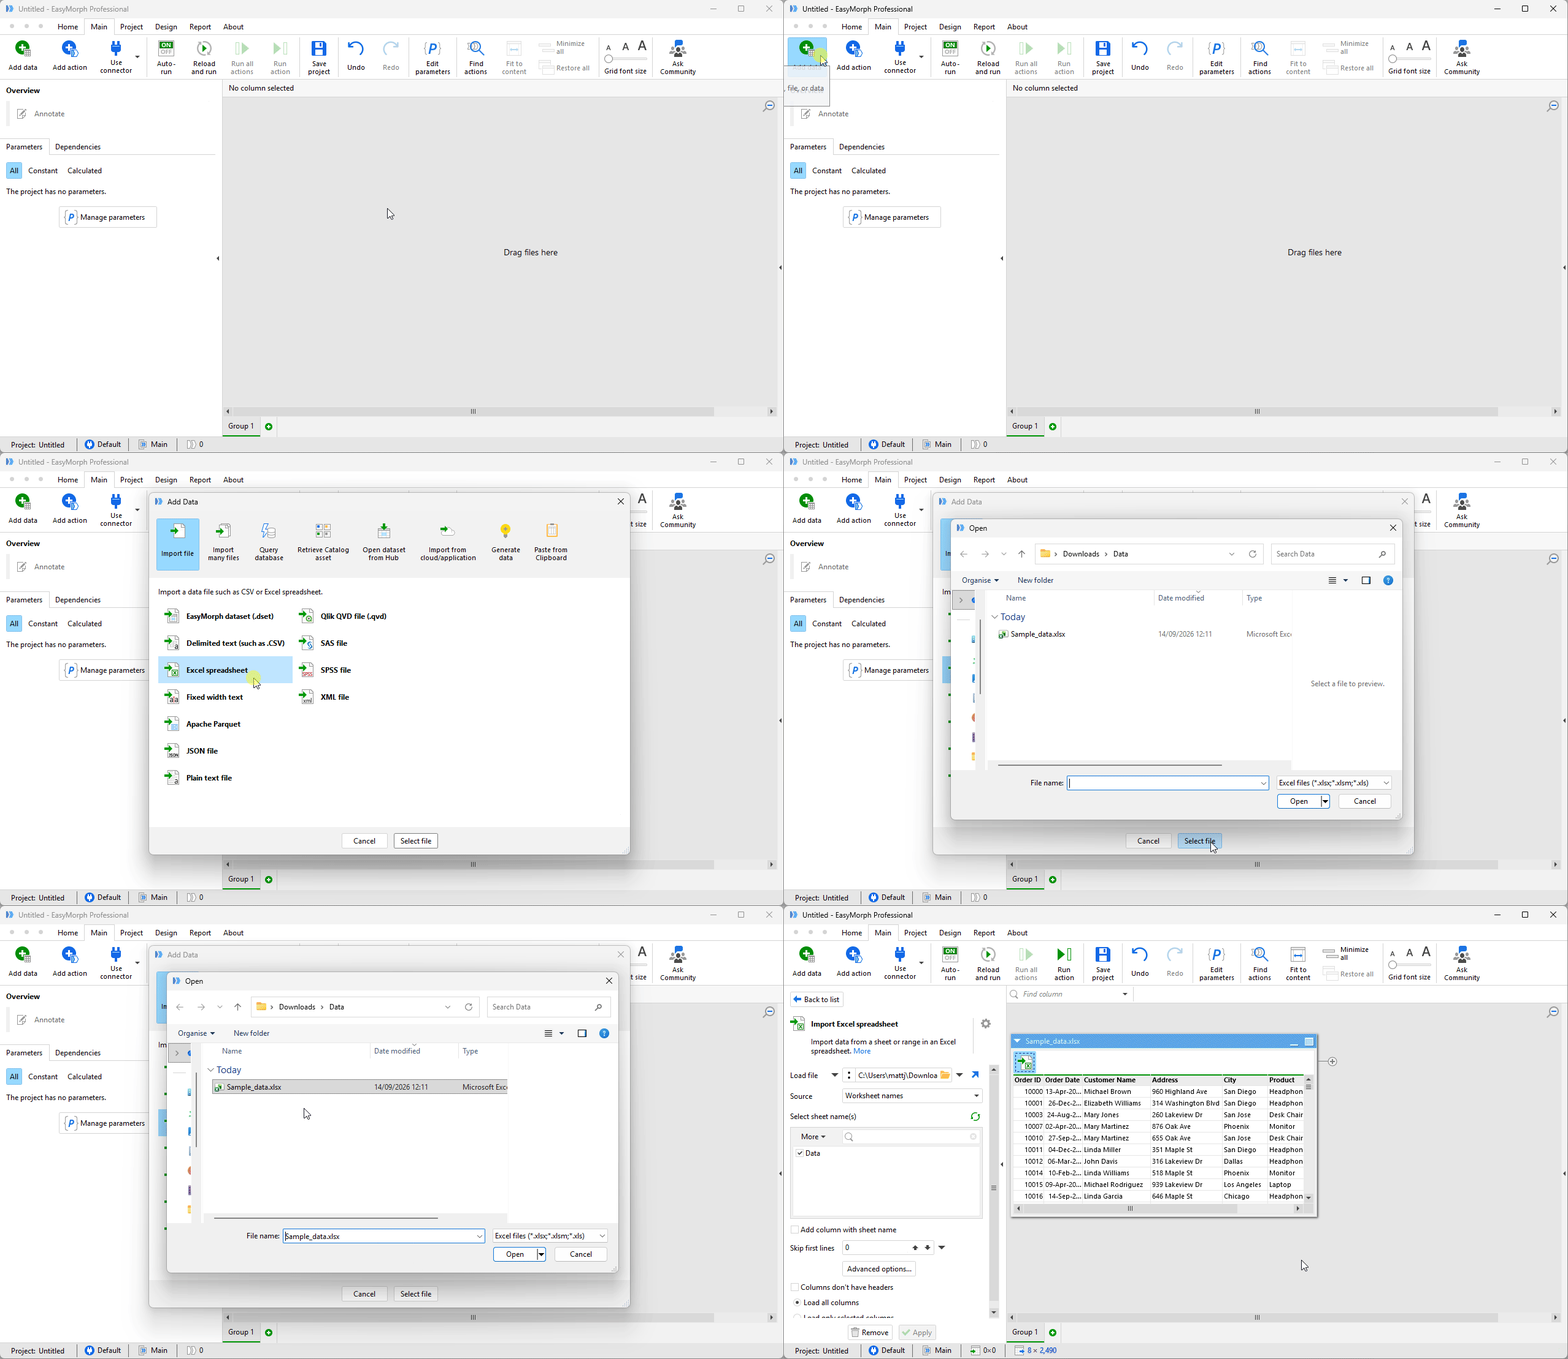
Once we’ve located and selected the data we want to load, EasyMorph will add the relevant import action to our workflow and we can see our data.
Data files such as CSV files or Microsoft Excel spreadsheets can also be quickly added to our workflows by simply dragging-and-dropping them onto the workflow canvas.
For more information on loading data files into EasyMorph, see the Loading one or many files tutorial.
Transforming our data
With our data loaded, we can begin to add additional actions to our workflow to transform the data as needed. We add actions to our workflow using the Add action button on the left of the top navigation bar, next to the Add data button we just used. When we click the Add action button, the left-hand setting panel will show us all of the available actions. There are more than 180 actions in EasyMorph and to help you navigate them we organized them into 5 categories:
- Import — those that load data into EasyMorph from a file, database or other source.
- Create — actions that generate data such as a list of files in a specific folder, a list of dates or a hard coded lookup table.
- Transform — those which modify data in some way.
- Export — actions that export the data from EasyMorph into a file, database or other system.
- Workflow — actions which don’t directly modify the data, but which instead perform another task such as renaming a file, running another program or sending an email.
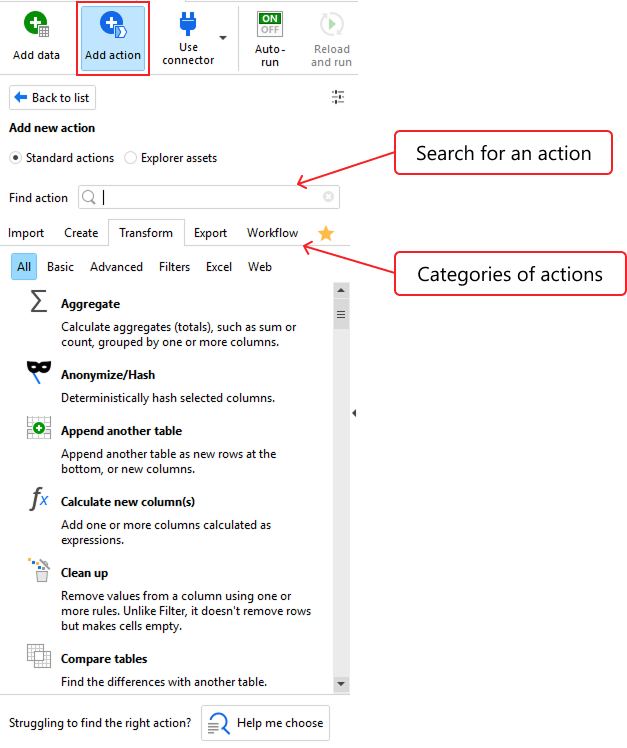
We can browse and search for the action we need. Once located we can drag-and-drop it into a table in the workflow canvas. We can also reorder the actions in a chain by dragging-and-dropping them into a new order.
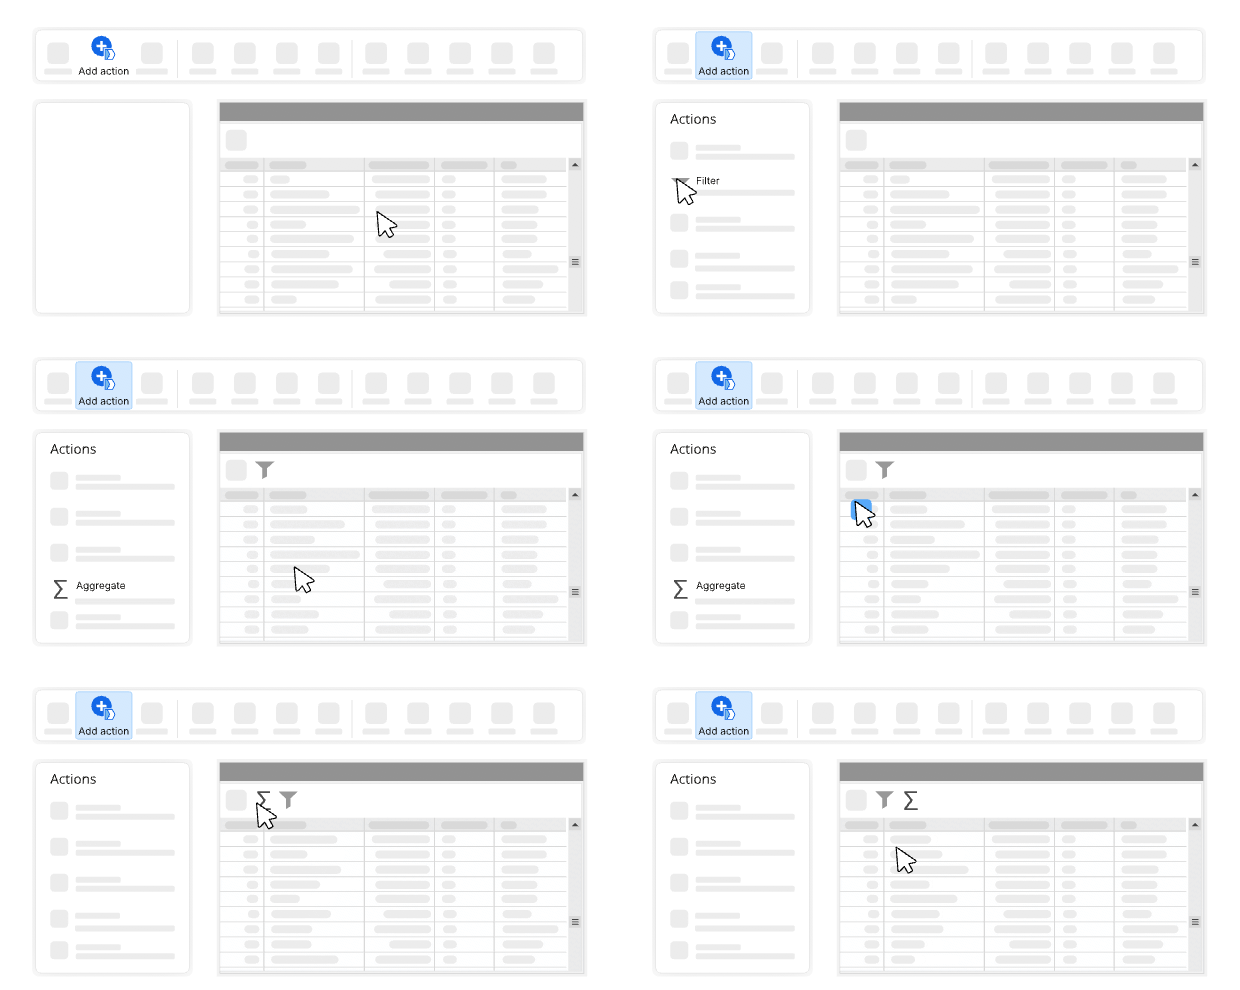
If we select any action in our workflow, the left-hand settings panel shows us the settings for the action.
Sorting and filtering our data
Let’s sort our data by finding the Sort action and dragging and dropping it to our table. In the settings panel we can configure it to sort by the “Order Date” column.
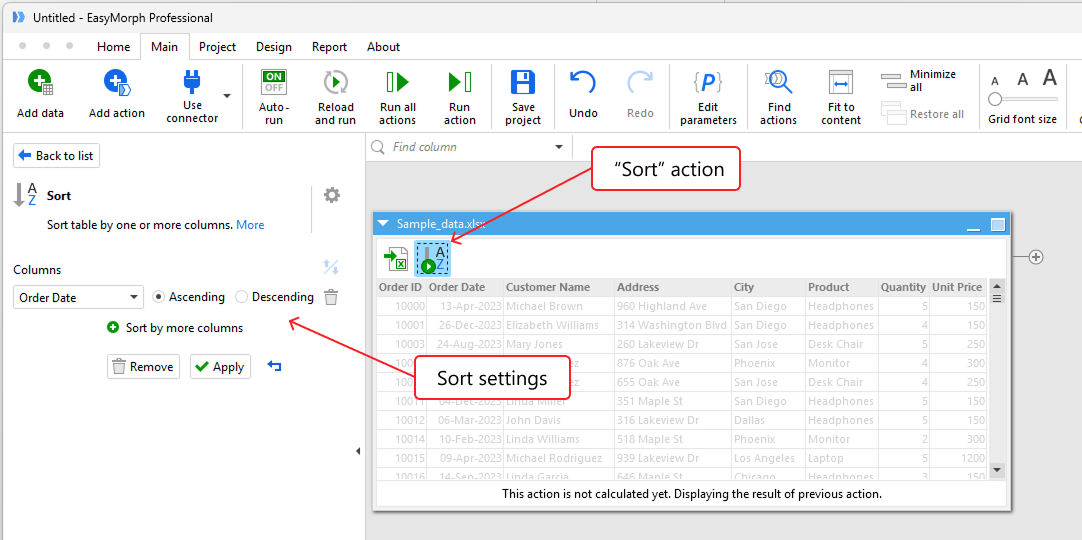
We can also add the Filter action and configure it to filter the “Product” field to only “Microphone”, “Laptop” and “Monitor”.
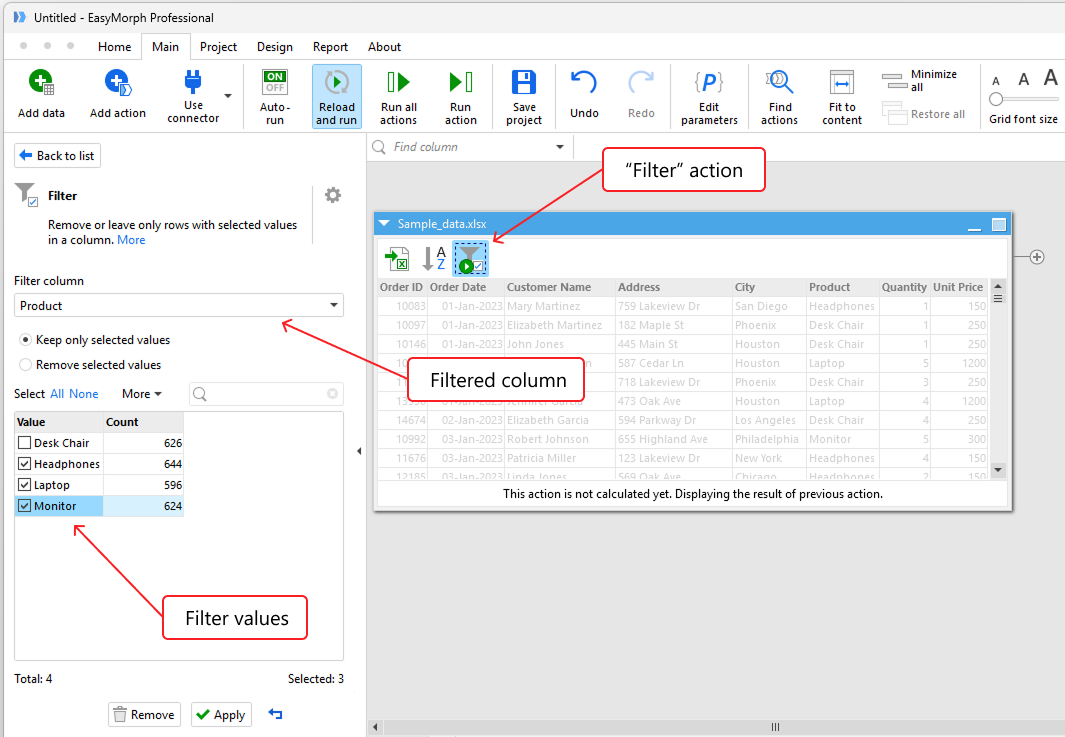
There are several different filter actions allowing us to filter data in different ways. In this example, we're using the most basic Filter action.
Merging data
Our data contains a “City” field but no state. Let’s add this CSV file to our workflow and merge it into our data.
Sample data download States_lookup.csv
We can load the data into EasyMorph in just the same way we did above, clicking on the Add data button and this time selecting the Delimited text (such as .CSV) option.
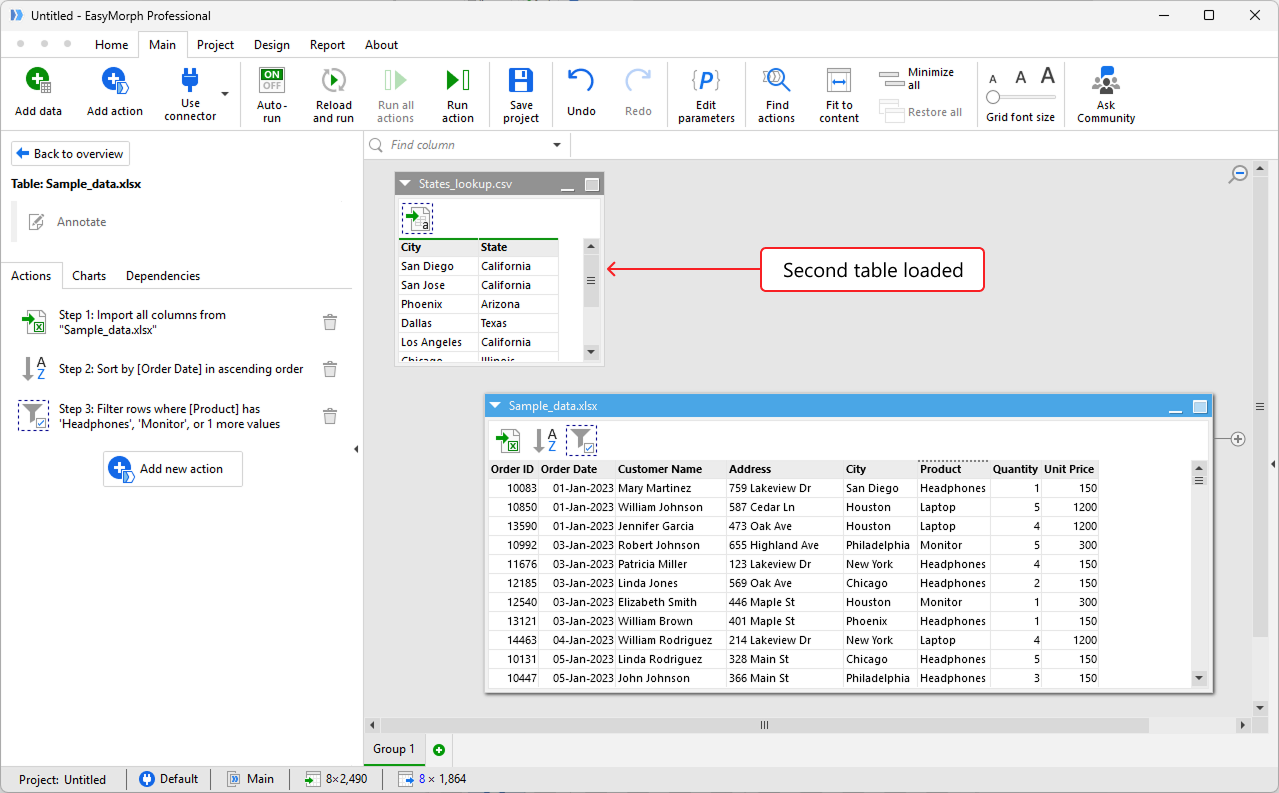
As we can see, our CSV file has been loaded into EasyMorph but is not yet merged into our main data table (there is no arrow flowing from our new table to our main data table). To merge the data, we can find the Merge another table action and drag and drop it into our main data table. We can configure the action to:
- Use our states lookup table as the source for our data merge.
- Connect the two tables using the “City” field in each.
- Use “Lookup” ad the merge mode.
- Select the “State” field to be added to our data table.
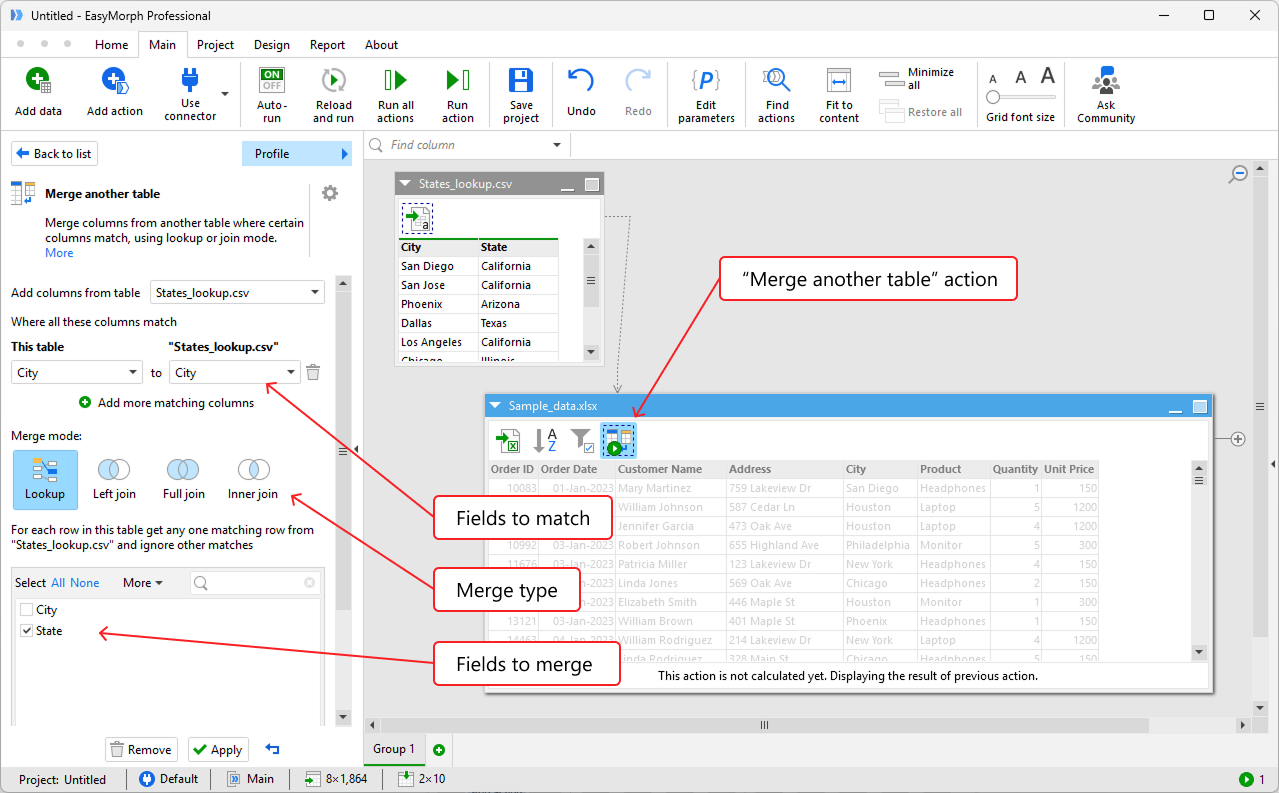
As easy as that, we’ve performed our first data merge in EasyMorph. We can now see a dotted arrow indicating the direction of the merge.
Outputting the transformed data to a new file
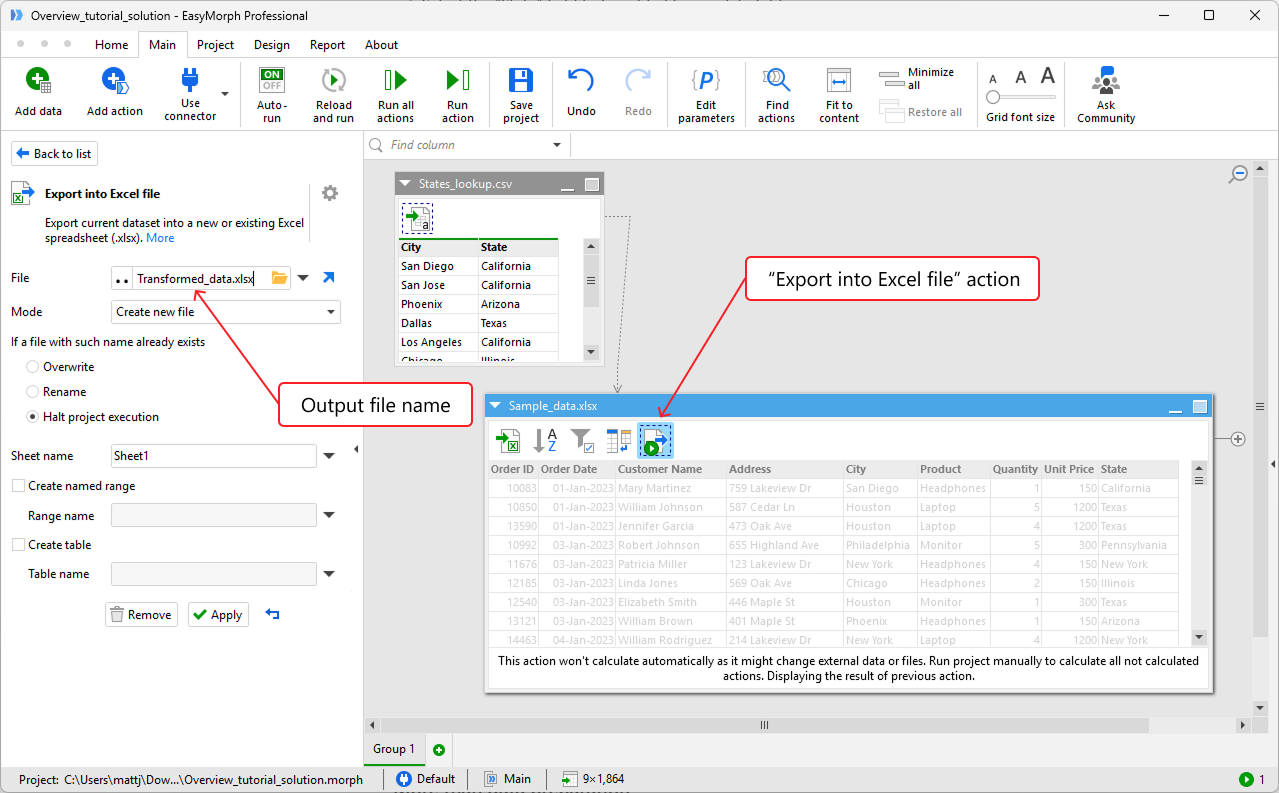
With our data prepared as needed, we can output the table to a new Excel spreadsheet file (or any other file type supported by EasyMorph). In the same way as transformation action, we can add the Export into Excel file action, specifying the locations and name for the output file.
Do more than just data preparation
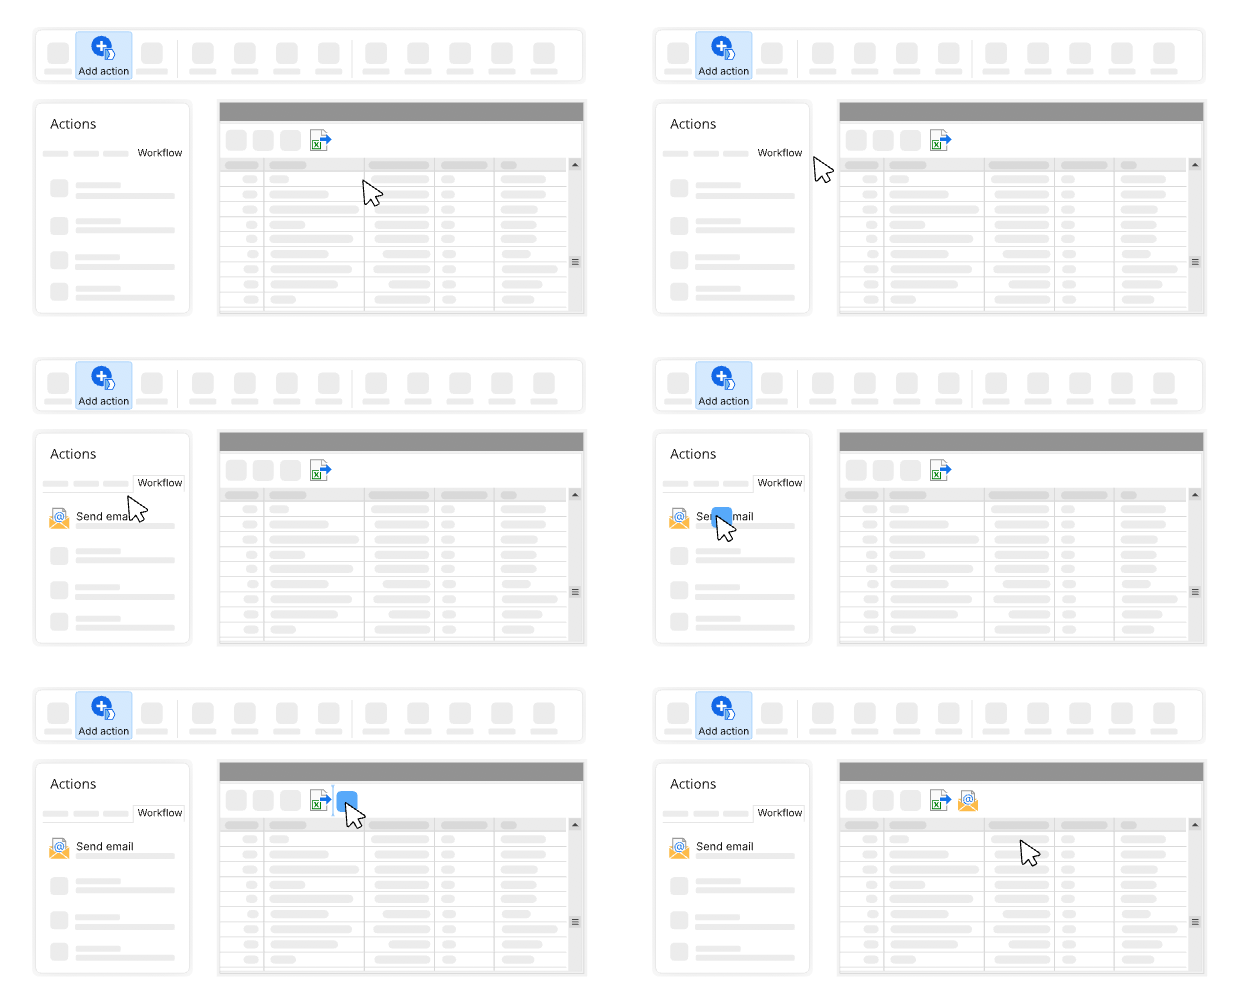
Although the majority of actions involve loading, transforming or saving data, there are many actions which perform other related steps and tasks, such as downloading some files from a network or cloud drive, or sending an email. This means EasyMorph workflows can be built to automate the full end-to-end process, not just the data preparation part.
These transformation action can be added to our workflows in just the same way as any other action. We could add the Send email action to the end of our workflow, configuring it to send an email with the output Excel spreadsheet attached.
Saving our project
In just a couple of minutes we’ve built our first simple workflow. We can now save our EasyMorph project so that we can rerun it next time we have an updated data file.
If you’ve followed along using the example data provided above, you should have a workflow that looks something like this one:
Download the example project: Overview_tutorial_solution.zip
Learn more about EasyMorph
You’ve hopefully now got a good understanding of the basic principles of EasyMorph workflows and are ready to begin loading and preparing your own data.
We’ve only scratched the surface of what EasyMorph can do. To learn more, check out the rest of the tutorials.